
Production
10 Tips EVERY Serum Owner Needs to Know
Xfer Serum is a very powerful synth that goes very deep. With a bewildering array of parameters and options available, it can be as simple or as complex as you want it to be.
Here are 10 tips that you can implement right now to get more out of Serum.
Video
Tip 01: Sync Envelopes to Tempo
Ensure you have “Double-Click for typable values on controls” enabled on the Global tab.
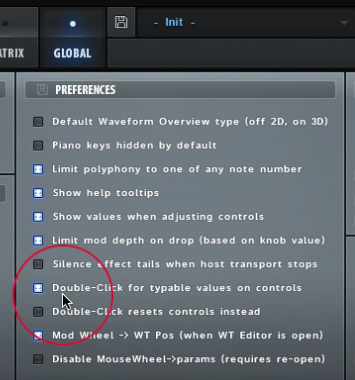
With this enabled, you can double-click a parameter in Serum to enter the value you want with your keyboard.
On the envelopes, you can also enter beat devisions like a 1/4 note for example. When you enter this, Serum will work out how many milliseconds there are in a 1/4 note at your projects current tempo setting.

Tip 02: Modulate by Semitones in the Mod Matrix
By default, the modulation assignment sliders in Serum are set in a percentage value. This makes it quite tricky to get the exact semitone value you want when dealing with pitch destinations like the Master Tune.
Again, make sure you have “Double-Click for typable values on controls” enabled on the Global tab.
As an example, lets say we want to modulate the Master Tune by 7 semitones.
Double-click the slider and enter “7st”. Serum will set the amount to exactly 7 semitones. The slider says 5, but this is 5 point something percent, which is exactly 7 semitones. “12st” would give us an octave.

This only works on the course tuning destinations OSC A Course, OSC B Course, Master Tune and Noise Pitch.
Tip 03: Key Command Modifiers for LFO Shapes
Serum’s LFO editor is insanely powerful, and it has a number of key command modifiers to help you create your LFO shapes.
Holding Option / Alt while dragging a point will snap the point to the grid in the background.
Holding Option / Alt while dragging a tension handle will adjust all the tension handles at once.
Holding Shift and dragging will give you a step sequencer that snaps to the grid.
Holding Option / Alt and Shift will snap the step sequencer to the vertical grid as well.

You can right click to choose the shape of the step sequencer between Flat, Ramp Down and Ramp Up.
Tip 04: An Arpeggiator in Serum
Serum doesn’t have an arpeggiator built in, but that doesn’t mean we can’t make one.
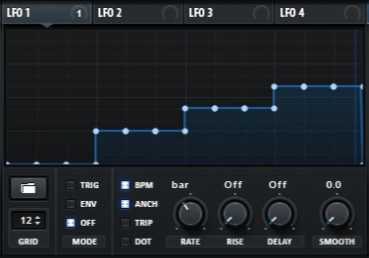
In the Mod Matrix, set up LFO 1 to modulate the Master Tune. Double click the slider and enter “12st” to modulate the Master Tune by an octave. Check that the type of modulation has a single arrow to make sure it’s in unipolar mode.
Back on LFO 1, adjust the grid size to 12. This will give us 12 vertical lines to the grid, each representing 1 semitone.
Now holding Option / Alt and Shift you can create an arpeggiator pattern with the step sequencer, counting the grid lines to get the notes you want.
Tip 05: Drag LFO Shapes to Oscillators
If you hold Option / Alt while dragging an LFO, you can drag the LFO to the Oscillator A or B wavetable view. This will replace the current wavetable with the shape in the LFO editor.
Now you can draw your waveforms in Serums powerful LFO editor, and use them as oscillators.

Tip 06: Hidden Modulation Sources
If you’re new to Xfer Serum, it might seem like the modulators down the bottom (the ones that you can drag and drop) are the only modulation sources.
However, if you right click a parameter and go down to Mod Source, you will find more modulators that can’t be dragged and dropped.

My favourite of these modulators is the NoteOn Rand. I like to modulate the wavetable position with NoteOn Rand so every time a note plays, you get a different wavetable position. This is great for plucks or arpeggios that sit in the background to make each note slightly different and give it its own character.
Tip 07: Velocity & Note Curve Graphs
The Velocity & Note graphs in Serum can be edited in much the same way as the LFOs can be.
You can double-click to add points, and use the same key command modifiers as the LFO editor.
What’s the point in creating weird graphs for note values?
If you have a melody or a baseline that runs over only a small amount of notes, you can create a note graph that spans just those notes. You can then use note to modulate the wavetable position to give each note its own wavetable position, and its own sound.
Watch the green dot appear on the note graph while your melody / baseline is playing to see where to position the your custom graph.

Tip 08: Modulation Assignment Curves
In Serums Mod Matrix, each modulation assignment has a curve parameter.
This curve parameter can be used to change how a modulator effects a destination. You can click and drag this up to get an exponential effect, or drag down to get a logarithmic effect.

Tip 09: Alternating between 2 different LFOs
Serums Mod Matrix has an Aux Source for each modulation assignment. This means you can set a modulation assignment to go via something else, like a macro for example.
Set LFO 1 to modulate the Filter Cutoff, and set the Aux Source to Macro 1.
With this set up, Macro 1 in the Aux Source scales the depth of the modulation assignment. When Macro 1 is all the way down, there is no modulation. When Macro 1 is all the way up, there is 100% of the assignment slider depth.
We can set 2 different LFOs to modulate the same destination via the same Aux Source. When we invert 1 of the Aux Source assignments we get the opposite effect for that assignment, meaning we can alternate between the 2.
Set LFO 2 to modulate the Filter Cutoff as well, and set the Aux Source to Macro 1. Now set the Mod Column for the LFO 1 assignment to Inverted (inv).
With this set up, when Macro 1 is all the way down, LFO 1 has full modulation depth. When Macro 1 is all the way up, LFO 2 has full modulation depth.

Tip 10: Importing Audio Options Explained
When you drag an audio file over to the oscillators in Serum, you are presented with a number of different options for importing said audio file. But what the hell do they all mean?

The Dynamic Options
The first two options, “import: normal (dynamic pitch zero-snap)” and “import: normal (dynamic pitch follow)” are dynamic. They are designed for when the sound you are importing has some pitch movement in it, like some pitch bend for example.
The size they capture for each table, or each single cycle, is dynamic. It’s varying the size of the capture for every single table based on how it believes the cycle, or the pitch of each table is changing.
The two dynamic options work by generating a pitch map, like you would see in Melodyne or any other pitch correction software where you have a pitch contour. After Serum has generated the pitchmap, it goes through and figures out how long it wants to capture & from where for each table, (each single cycle).
The first one, zero snap, tries to snap to zero crossings. It’s better for simple waveforms, like a saw that has a bit of pitch bend for example.
Dynamic pitch follow is better for more complex material that changes pitch and has lots of zero crossings.
Constant Framesize
The next option, “import: constant frame size – pitch average” guesses the pitch of the file and uses that cycle length, for every table.
The FFT Options
The FFT options resynthesize the tables. They take chunks of time and look at what is going on in the frequency spectrum in that chunk of time and kind of average out what’s going on. Serum then it resynthesizes a waveform based on what it has analysed. Then it does the same thing for another slice of time, overlapping with the first one, and so on.
The FFT options create new waveforms, so it’s not going to look like the original waveform, but it should sound something like it.
The number after each is how many samples will be used in each chunk of time. The higher the number, the longer the slice of time analysed, and therefore the higher pitch it will sound because you can fit more cycles in.
The FFT options are good for complex sounds like animal noises, human speech and sounds with lots of movement.
Which option should you use?
The dynamic options are for sounds that move in pitch.
Import constant frame size is for static pitches, and is the best option to try first, in my opinion.
The FFT options are good for complex sounds.
As always, it’s best to experiment with all of them. If a sound doesn’t sound good on one of them, try another one.